

10 Tips to Launch Your Squarespace Website With Confidence
DIY-ing your website can be nerve-wracking. Even with intuitive website building platforms, like Squarespace, some steps can be overlooked when doing it on your own– and that is totally okay! Because I am here to share with you the steps I take to ensure that every Squarespace website project I work on is ready to hit publish and launch off for the world to see.
Taking the extra couple minutes to ensure all of these are ticked off before launching will create all the difference for your website visitors, search engines, and YOU!
Before we start, have you signed up for a Squarespace account yet? If not, you can do so here and save 20% off. (This is an affiliate link which means I get a commission for purchases made through these links with no extra cost to you of course!)
Use the following 10 tips as a checklist when building your Squarespace website.
1. Double-check your page URLs
When you duplicate a page your URL will appear as /about1. I see this happen A LOT and we don’t want that!
Here’s how you can double-check your links so they appear professional:
On pages, hover over the page and click the gear icon
A pop-up will appear with 4-page settings on the left, stay on the one that popped up: General
Change the link accordingly under URL slug

The same also goes if you have a blog on your website. But with a little bit of a twist. Your settings may have automatic date/time URLs turned on for your blog posts which once again we don’t want! The best practice I use for my blog is to plug in keywords for SEO purposes and having dates and times in your URL won’t do anything for your SEO.
For example, let’s take this blog post for instance. The title is 10 Tips To Launch Your Squarespace Website with Confidence rather than having the URL be the same as the blog post title since that is already working its SEO magic, I have edited the URL to be /squarespace-website-launch-checklist
Related: How To Optimize Your Squarespace Blog
Here’s how you can double-check your blog links to take out the date and time:
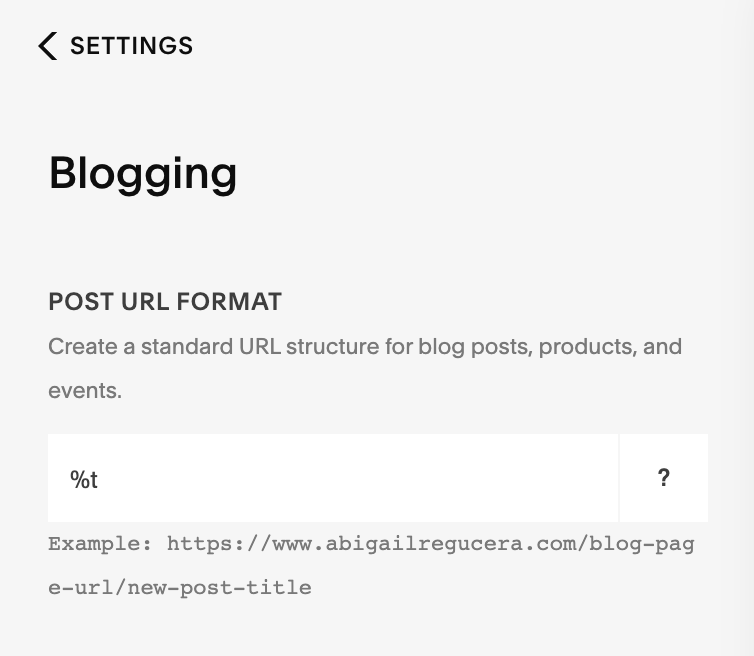
Go Settings scroll down to find Blogging
Under Post URL Format make sure that it shows up as %t - that makes sure it’s display your title. You can hover on the ? on the right of the input to learn more.
2. Upload a Favicon
Nothing screams (amongst many other things) I don’t care about my online presence like the default favicon. Again, the amount of times I have seen this is one too many. Short for favourite icon a favicon is what you see on the browser tab, next to the page title. The favicon MUST be a simplified version of your logo, please do not put your wordmark logo as the favicon. The default Squarespace favicon is a dark grey 3D box.
Related: Why You Need Logo Variations
Here’s how you change your favicon:
Go Design and find Browser Icon
Upload your favicon with the specs of 16 x 16 pixels and save as a PNG
Can’t find it? You’re likely on the old version of Squarespace. In that case, find Logo & Title instead and scroll down to Browser Icon (Favicon)

3. Make sure your site is secured
A secure website adds an extra level of security and trust for your website visitors (and you!) This can all be solved with an SSL certificate. Google also favours websites that are secured so that means an SEO bump for your website. If your website is not secured it will show in the search bar in your browser.

How to ensure your website is secured:
Go to Settings and find Advanced
Once on Advanced find SSL
Make sure Secure and HSTS Secure are checked
If you need help troubleshooting, please refer to this article from Squarespace Help Center

4. Optimal site speed on all devices
AMP (Accelerated Mobile Pages) makes it easy to create better experiences on the web like helping your web pages load faster. AMP is optimized for mobile browsing, ensuring your website is user-friendly on all devices. While there are many other factors to help your website speed, this is once again another thing Google favours! (search engines are so needy eh?) Wonder what your site speed is? You can check it out with this free tool here.
How to enable amp:
Go to Settings and find Blogging
Please note: AMP only applies to blog posts, so if you don’t have a blog you can skip this step.
Make sure Use AMP is checked

5. Add a social sharing image
The social sharing image is the image that shows up when you share a link. Most oftentimes when there is no image set, nothing will appear at all or it will default as your logo cut off because it’s not in the right specs as a social sharing image. Similar to curating a scroll-stopping social media graphic, treat your social sharing image the same—this will stand out to fast scrollers a lot more.
How to upload a social sharing image
Select the photo you like and ensure the specs are 1200 x 630 pixels and saved as a JPG
Go to Design and find Social Sharing
Can’t find it? You’re likely on the old version of Squarespace. In that case, find Logo & Title instead and scroll down to Social Sharing Logo
If you have a blog, it is important to note that whatever image you make as the featured image for that blog post, that will be the social sharing image for that blog post link.
6. Enable cookie banner
I know what you’re thinking “I’m sick of all these websites trying to feed me all these cookies! (I highly recommend you click on that link, it’s a really funny video)” But what a lot of people don’t know is that it’s a legal requirement for a website to be GDPR compliant. And with that, we have let website visitors know we use cookies on our websites and state it in our privacy policy + terms and conditions. (This is an affiliate link which means I get a commission for purchases made through these links with no extra cost to you of course!)
How to enable cookie banner
Go to Settings and find Cookies & Visitor Data
Check Enable Cookie Banner
Feel free to go to Customize to change the copy so it’s consistent with your brand tone
If you’re NOT using your site analytics and want to learn about the people visiting your site you must check Disable Squarespace Analytics Cookies and uncheck Enable Activity Log
I am using site analytics like Google Analytics so you will see mine are enabled. If that’s the same case for you, ensure that you have checked Opt-in & Out so the website visitor consents by GDPR

7. Disable Squarespace badge
If you’re on the newest version, Squarespace 7.1, you can skip this step. But if you’re on 7.0, keep reading! Some Squarespace 7.0 templates default is to have the badge enabled. We want to disable this badge so you can keep your website branded to you and not Squarespace.
How to disable Squarespace bade
Go to Design and find Squarespace Badge
Select Disable Squarespace Badge
8. Enable Pinterest save button
Turning on the pin-it button lets website visitors save your valuable content to their Pinterest board. This is a great way to boost your marketing without even lifting a finger (well I guess once to enable this feature)
How to enable the Pin-it button
Go to Marketing and find Pinterest Save Button
Enable it to either just blogs or blogs, pages and products
9. Optimize SEO for every page
There are many factors that go into SEO (Search Engine Optimization) that you may need to outsource an SEO expert for in the future or learn the basics on your own. But a step you can definitely do on your own today is optimize the Page Title and Page Description of every page. This is what is displayed on search engines when someone searches something and your website comes up.
Related: SEO: The Only Guide You’ll Ever Need to Understand It

Here is how to add SEO titles and meta descriptions to your pages
Before you get started, I recommend opening up a Google doc and creating a table of each for the page title and description. Then use this free tool to check if the copy is the correct character limit as well as visualize your copy in real-time. Then plop it in the Google doc and it’s just copying and pasting from the doc to Squarespace from there!
Go to Marketing and find SEO. This is only for your homepage
For the rest of your pages, go to Pages and then hover over and click the Gear Icon
Select SEO on the left side from the pop-up
For blog posts, hover over the blog post and click the Three Dots and then choose Settings
Select SEO on the left side from the pop-up

10. Double-check your form blocks
If you are using form blocks on your website, do not forget to connect them properly! It would be a nightmare to end up missing out on potential clients from your website.
Check all your forms by
Hover on the form and click on the Pencil Icon
On the pop-up click the Storage tab
On Storage, make sure it’s on the correct option. If this is a contact form I recommend Email because then you will get an email about the inquiry. Double-check your email before your press save!
Alternatively, you can select Google Drive and it will automatically make a Google spreadsheet with the details from the form inputs.

Annnndd that’s it! Now you are fully equipped to launch your Squarespace website with confidence. If you enjoyed this post and would love to learn more about Squarespace, I invite you to subscribe to my monthly Squarespace resources email—Master The Magic of Squarespace with the button below.